SEA WAVES
This tutorial is ©Delectable PSP Addictions . It may not be copied or reproduced in whole or in part
without my written permission.
I used PSP9 and AS for this tutorial but I think it can be done with any version of PSP.
AAA-Frames filter.
Font used: A&S Black Swan
For this tut you need a sea themed scrapkit or the one I used which is PTU called Sea Wave by agnesingap designs at http://digital-crea.fr/shop/A mermaid tube or the one I used: AlessiaC tube (Mermaid) , available at MTA:
mask 71InsatiableDreams at http://www.insatiabledreams.net/Cat_s_Masks.html
I am using a boat and a seagul animation and I don't know the creator, sorry I can't share it.
So use any bird and or boat animation you may have.
So use any bird and or boat animation you may have.
Open a transparant image 600 x 600 fill with white. Add a new layer and selections, select all.
If you have the scrapkit then you can follow my steps, if you don't have it you have to use a
background of your own and also elements of your own choice. (Be copyright aware!)
Here are the steps when you have this kit:
Open paper 1, resize by 19%, copy and paste into the selection. Select none.
Apply the mask, merge the group.
Open elements 9, 15,18, 22, 52, 60, 62, 78, 80 and 81. resize to your liking and place them on your
canvas where you want them (see my screenshot as a reference, if you like what I did).
Open element 25 (the sand), resize and place it on your canvas a little to the right.
Open your tube, resize and copy and paste onto your work and place it to your liking (see my tag as
a reference). Give it a dropshadow to your linking.
Duplicate the sand layer and put it on top of your work and place it a bit to the left this time to cover
up the bottom part of the rock where the mermaid is sitting on.
copy merged all layers and paste it on top of your work.
Adjust, blurr, Gaussian blurr at 45.
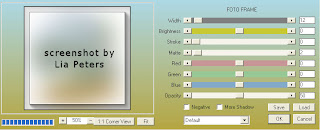
Apply AAA Filters, Foto frame with the settings below:
Selections, select all, modify, retract by 14, hit the delete button. Selections, select none.
Put all the correct copyright information clearly visible on your tag.
If you don't want to animate then you're done and can save your work as a JPG or PNG now.
For the animation part:
Select the mermaid layer. With your freehand lasso tool set to point to point, lasso the hair (see
screenshot below), promote it to a new layer and name it hair, select none.
Close off all layers, except for the hair layer. Copy merged and paste in Animation Shop as a new
frame.
Effects, insert image effects, underwater with the settings below.
Apply and remove the first frame so you have a total of 10 frames. Select all and paste carefully onto
your selected frames of the tag, trying to line the hair up with the hair on the tag.
If you have some bird animations and or boat animations, resize them too to your liking, and place them on your tag in all the selected frames)
Set the speed of all your frames to 18 in AS and you're done!
I hope you enjoyed this tutorial and if you try it, I would love to see your result!:)
http://www.tutorial-writers-inc.com/


Hiya Lia! Didn't know ya had tuts! Awesome girl!
ReplyDeleteHugs n luv,